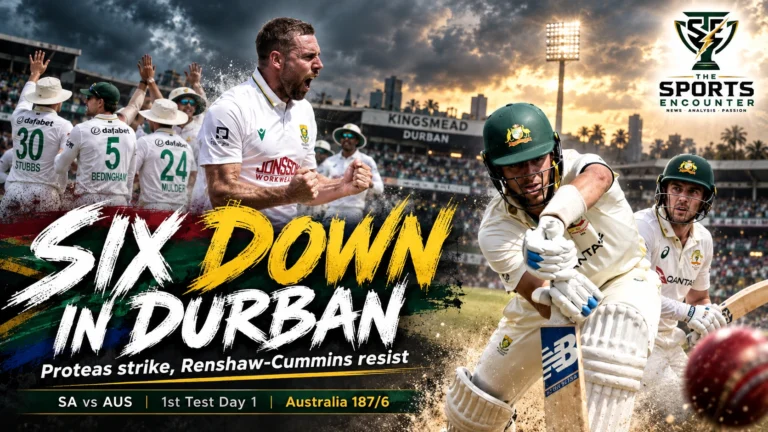
DURBAN, South Africa, October 9, 2026: South Africa had Australia reeling at 124 for six before Matt Renshaw and captain Pat Cummins rescued the visitors with an unbeaten 63-run partnership, only for fading light to bring an early end to the opening day of the first Test at Kingsmead on Friday. Marco Jansen, Wiaan Mulder and the returning Anrich Nortje claimed two wickets each as Australia, having elected to bat, struggled to 187 for six from 65.2 overs. Renshaw remained unbeaten on 46 and Cummins on 33 when the umpires ruled that conditions were no longer suitable for play, leaving the reigning World Test Championship winners frustrated after dominating most of the day.
Australia’s reshuffled batting order offered little resistance early on. Nic Maddinson marked his first Test in almost a decade with a 33-ball duck, Travis Head fell for nine, and South Africa struck twice with the score on 84 to remove Marnus Labuschagne and Steve Smith. Nortje then dismissed Alex Carey and Beau Webster in the same over to leave the tourists six down. Renshaw, moved to No. 5 to accommodate Maddinson’s return as an opener, subsequently became Australia’s most dependable batter. His partnership with Cummins has kept the visitors competitive, but the pitch’s assistance for seam bowling and the prospect of a prolonged second-innings examination mean neither team can regard the day’s work as conclusive.
South Africa vs Australia First Test: Day 1 Score and Match Summary
| Match Detail | Information |
|---|---|
| Match | South Africa vs Australia, First Test |
| Series | Australia tour of South Africa, 2026-27 |
| Competition | ICC World Test Championship 2025-27 |
| Venue | Kingsmead, Durban |
| Dates | October 9-13, 2026 |
| Toss | Australia won and elected to bat |
| Australia at Stumps | 187/6 after 65.2 overs |
| Top Scorer | Matt Renshaw, 46 not out from 115 balls |
| Other Not Out Batter | Pat Cummins, 33 from 72 balls |
| Leading South African Bowlers | Marco Jansen 2/35, Wiaan Mulder 2/31, Anrich Nortje 2/40 |
| Highest Partnership | 63 unbeaten, Renshaw and Cummins, seventh wicket |
| Play Stopped | Bad light, with Australia 187/6 |
| Day 2 | October 10, scheduled 9:30 AM local start |
The result has not yet been determined. Australia have four first-innings wickets remaining, and South Africa have not begun batting.
The ICC’s official Day 1 report
Australia’s 124/6 Collapse Exposes the Risks of a Reshuffled Batting Order
Australia’s decision to bat first placed immediate responsibility on an opening combination that had barely been tested together.
Travis Head and Nic Maddinson walked out with an opportunity to establish the innings against South Africa’s fast bowlers. By the 11th over, both were back in the dressing room.
Head made nine from 19 deliveries before Mulder had him caught behind by Kyle Verreynne. The dismissal required a successful South African review after the original decision went in the batter’s favor.
Maddinson offered considerably longer resistance without managing to score.
He faced 33 deliveries, repeatedly struggling to find scoring opportunities, before chopping a Marco Jansen delivery onto his stumps.
Australia were 24 for two after 10.2 overs.
For a side that had entered the series with questions surrounding its batting depth, the opening combination had produced an especially uncomfortable start.
South Africa’s bowlers maintained discipline rather than allowing Australia’s batters to escape the early pressure through loose deliveries.
Jansen used his left-arm angle and height to challenge the top order, while Mulder consistently forced Head and the subsequent batters to defend or make decisions around the off-stump corridor.
The conditions rewarded patience and accuracy. South Africa’s bowlers supplied both.
Why Did Australia Recall Nic Maddinson After Almost Ten Years?
Maddinson’s selection was one of the most surprising decisions ahead of the Test.
He last played the format in 2016, making three appearances during his initial international opportunity.
His return followed a difficult personal period, including treatment for testicular cancer and a gradual return to competitive cricket.
Australia brought him into the squad after Josh Inglis suffered a fractured finger. Cameron Green’s abdominal injury subsequently removed another important batting option.
The selectors ultimately chose Maddinson to open alongside Head, pushing Renshaw down to No. 5.
According to Cricket Australia’s official team announcement, the rearrangement reflected the need to replace Green while retaining flexibility in the batting order.
Cooper Connolly, another possible selection, had been dealing with illness during the week. Australia had not publicly established that illness as the sole explanation for leaving him out.
Maddinson’s dismissal does not establish that the selection was wrong. A single innings provides insufficient evidence for such a conclusion.
However, it reinforces the uncertainty that TSE explored in our examination of Australia’s aging Test squad and its succession problem.
Australia possess promising younger players, but their attempts to replace established performers have not always produced immediate answers.
Friday’s most striking irony was that Renshaw, displaced from the opening position, became the batter responsible for preventing the innings from deteriorating further.
Labuschagne and Smith Repair the Damage Before South Africa Strike Twice on 84
Marnus Labuschagne and Steve Smith initially restored a measure of stability.
Labuschagne scored 37 from 58 deliveries, striking six boundaries. Smith contributed 25 from 53 balls, including two sixes.
Their partnership added 60 runs for the third wicket.
That stand carried Australia from 24 for two to 84 for three and prevented the early dismissals from immediately becoming a full batting collapse.
Both batters were required to defend extensively against South Africa’s seamers, but Labuschagne gradually found scoring opportunities while Smith attempted to counter the pressure when the spinners entered the attack.
Smith struck two sixes against Keshav Maharaj, showing that Australia could still punish deliveries offering sufficient room for attack.
Unfortunately for the visitors, the partnership ended at the worst possible moment.
Labuschagne’s Review Fails on the Last Ball Before Lunch
Mulder trapped Labuschagne lbw with the final delivery of the opening session.
The batter challenged the decision, but ball-tracking returned an umpire’s-call verdict and the original dismissal stood.
Labuschagne had made 37 and Australia went to lunch on 84 for three.
The wicket was particularly valuable to South Africa because it removed a set batter moments before a scheduled break.
It also interrupted Australia’s first substantial partnership of the innings and forced a new batter to begin against an attack that had already established control.
Labuschagne entered the series under considerable scrutiny after his inconsistent recent Test performances.
TSE examined his selection position in our report on Australia’s decision to retain Labuschagne for the South African tour.
His 37 in Durban represented a useful response to that pressure, although it remained another innings in which he did not convert a start into a substantial score.
Smith Falls Three Balls After Lunch
South Africa struck again almost immediately after the interval.
Smith was hit on the finger shortly before his dismissal. He continued batting, but his stay ended when Jansen induced a catch to Mulder in the gully.
He was dismissed for 25.
Australia were 84 for four after 26.3 overs, having lost two of their most accomplished batters without adding a run.
There was no confirmed medical diagnosis arising from Smith’s finger impact, and the available reporting does not establish that it caused his dismissal.
The cricketing consequence was clear enough without speculation.
Australia had lost their two most experienced specialist middle-order batters in successive overs, leaving Renshaw and Alex Carey responsible for rebuilding an innings that was once again in serious difficulty.
Renshaw’s Return to No. 5 Becomes Australia’s Most Important Selection Decision
Matt Renshaw began the day facing an unusual assignment.
He had been considered an opening option during Australia’s ongoing search for a settled top order, but Maddinson’s inclusion moved him into the middle order.
By the time Renshaw was established at the crease, Australia had already lost four wickets for 84.
He responded with the most patient innings of the day.
Renshaw finished unbeaten on 46 from 115 balls, striking only three fours.
His strike rate of 40 reflected the difficulty of the conditions and the responsibility placed on him as wickets continued falling.
There was little benefit in attempting to match South Africa’s aggression with risky strokeplay. Renshaw concentrated on leaving deliveries, defending accurately and finding runs without exposing himself to unnecessary danger.
His innings also marked an interesting continuation of his contributions during the preceding ODI series.
In the third ODI at Potchefstroom, Renshaw had scored 30 from 29 deliveries as Australia recovered from early middle-order difficulties. That match, covered in TSE’s report on Australia’s rain-affected victory, provided a very different example of how he could contribute outside the opening position.
Durban required greater restraint.
Renshaw supplied it, first alongside Carey and then with Cummins.
His ability to survive sustained pressure became the difference between South Africa dismissing Australia cheaply and the visitors keeping their innings alive overnight.
Anrich Nortje’s Test Return Produces Two Wickets in Three Deliveries
South Africa’s most encouraging individual development was the return of Anrich Nortje to Test cricket.
The fast bowler had not played a Test since March 2023. His absence from the longest format had followed an extended period in which injuries and workload management complicated his opportunities.
Against Australia, he demonstrated why South Africa had been eager to restore his pace to the attack.
Nortje dismissed Alex Carey for 14 in the 42nd over, with Aiden Markram completing the catch.
Two deliveries later, he removed Beau Webster for four, caught behind by Kyle Verreynne.
Australia had slipped from 120 for five to 124 for six.
Both wickets arrived in the same over and left the visitors needing their captain to rescue an innings that was running out of specialist batters.
Nortje finished the day with two for 40 from 13.2 overs.
South Africa’s Decision to Restore Nortje Pays Off
Nortje’s return became particularly important because Kagiso Rabada was unavailable for the opening Test while recovering from a hamstring injury.
The hosts therefore entered the match without the bowler who had played such a decisive role in defeating Australia in the 2025 World Test Championship Final.
Nortje offered an alternative form of pressure through speed, hard lengths and his willingness to challenge batters with short-pitched deliveries.
The ICC’s official South Africa team announcement
His two wickets provided an immediate reward.
They also strengthen South Africa’s pace options ahead of the remainder of the series, although his workload will need to be assessed carefully after such a long absence from Test cricket.
Rabada’s eventual return could give captain Temba Bavuma further selection options. His availability for the next Test has not yet been established through a final team announcement.
Renshaw and Cummins Turn 124/6 Into an Unbeaten 63-Run Rescue
When Cummins joined Renshaw, Australia were 124 for six after 41.6 overs.
The remaining batting lineup contained Mitchell Starc, Nathan Lyon and Josh Hazlewood, but the visitors could not afford to expose the tail while South Africa’s bowlers were operating with confidence.
Cummins responded with an innings of considerable value.
He reached stumps unbeaten on 33 from 72 balls, striking five fours.
Renshaw contributed the stability that allowed his captain to score when opportunities arose.
The partnership developed gradually. The pair accumulated their first 50 runs together from 120 deliveries before extending the stand to 63.
South Africa continued attacking, but the batters resisted the temptation to chase the scoring rate.
By tea, Australia had reached 149 for six.
Renshaw was unbeaten on 32 and Cummins had nine.
They added another 38 runs after tea before the weather and light intervened.
Why the 63-Run Stand Matters
Australia’s unbroken seventh-wicket partnership accounts for approximately 34 percent of their entire first-innings total at stumps.
That is a remarkable contribution given that the partnership remains unfinished.
It also exceeds the 60-run stand between Labuschagne and Smith, making it the largest partnership of Australia’s innings so far.
The importance goes beyond runs.
Renshaw and Cummins consumed time, forced South Africa’s bowlers to continue working and prevented the home side from completing the innings while the conditions remained favorable.
That resistance may become especially valuable if Australia’s established pace attack can exploit similar assistance when South Africa begin batting.
Australia have previously demonstrated how dramatically fast bowling can change a Test. During the second Test against Bangladesh in August, Starc collected 10 wickets as the hosts recorded an innings victory in Mackay.
Our report on that extraordinary two-day Test examined the effectiveness of Australia’s pace attack when conditions and execution combined.
Durban presents another opportunity for those bowlers, provided Australia can secure a competitive first-innings total.
Why South Africa’s Fast Bowlers Dominated Despite the Selection of Two Spinners
South Africa selected Keshav Maharaj and Simon Harmer together, signaling an expectation that spin could become important as the match progressed.
But the opening day belonged almost entirely to seam bowling.
Jansen took two for 35 from 16 overs, including seven maidens.
Mulder returned two for 31 from 15 overs with six maidens.
Nortje claimed two for 40 from 13.2 overs.
Between them, the three fast bowlers claimed all six Australian wickets while conceding 106 runs from 44.2 overs.
Their combined economy rate was approximately 2.39 runs per over.
By contrast, Maharaj and Harmer bowled 21 overs between them, conceded 67 runs and finished wicketless.
| Bowling Group | Overs | Runs | Wickets | Economy |
|---|---|---|---|---|
| Jansen, Mulder and Nortje | 44.2 | 106 | 6 | 2.39 |
| Maharaj and Harmer | 21 | 67 | 0 | 3.19 |
The difference was substantial.
South Africa’s seamers were able to challenge Australia’s batters through lateral movement, disciplined lengths and occasional sharp bounce.
The spinners remained part of the pressure-building effort, but the wickets arrived whenever the fast bowlers found a way through.
This does not make the selection of two spinners a mistake.
Test pitches can change considerably over five days. Maharaj and Harmer may become more influential as the surface wears, particularly when Australia bat again or South Africa need to defend a total later in the match.
The opening day simply demonstrated that Bavuma possessed enough pace resources to threaten Australia even without Rabada.
South Africa had shown similar adaptability during the preceding ODI series, where spin played a decisive role in a very different format. As TSE reported after the first ODI in Durban, Maharaj took four for 20 after Australia had raced to 90 without loss.
The longer format places different demands on the bowlers, but the underlying strength remains relevant: South Africa can threaten established Australian batters through more than one method.
Bad Light Ends Play Just as South Africa Look for the Final Four Wickets
The final interruption came after Nortje delivered a short-pitched ball to Renshaw at approximately 141 kilometers per hour.
Renshaw ducked underneath it, and the umpires subsequently assessed the light conditions.
Play was suspended at 3:23 PM local time, with Australia 187 for six after 65.2 overs.
Floodlights were operating at Kingsmead, but the conditions had deteriorated sufficiently for the umpires to remove the players.
South Africa appeared disappointed with the decision, understandably believing that another short passage of play might have produced additional wickets.
Australia, meanwhile, had two established batters at the crease and a partnership that was beginning to frustrate the home attack.
The stoppage therefore created a complicated outcome.
South Africa had been denied the opportunity to attack Australia’s lower order for the remainder of the afternoon. But the same interruption also prevented Renshaw and Cummins from adding further runs while they were settled.
Neither side could know which possibility would have prevailed.
Conditions failed to improve, and the umpires eventually called stumps.
Why Didn’t the Floodlights Allow Play to Continue?
Floodlights do not automatically make conditions suitable for Test cricket.
Umpires must consider whether batters can safely see the ball, particularly when fast bowlers are delivering at speeds exceeding 140 kilometers per hour.
Dark clouds, inconsistent visibility and the difficulty of tracking the ball against the background can create safety concerns even when artificial lighting is available.
The final assessment belongs to the umpires.
In Durban, their decision ended a day that had already featured sustained pressure from South Africa’s fast bowlers and a late Australian recovery.
How Much Cricket Was Played on Day 1?
Only 65 overs and two deliveries were completed before stumps.
The original day’s schedule ran from 9:30 AM until 5 PM local time, subject to the usual session breaks and playing conditions.
The early conclusion resulted in lost playing time, which organizers will attempt to accommodate through an extended middle session on Saturday.
There will be no earlier start because the match already begins at 9:30 AM.
Day 1 Session Breakdown: South Africa Win the First Two, Australia Resist in the Third
| Session | Australia Score | Runs Added | Wickets Lost | Overs |
|---|---|---|---|---|
| Morning | 84/3 | 84 | 3 | 26 |
| Afternoon | 149/6 | 65 | 3 | 27 |
| Evening, shortened | 187/6 | 38 | 0 | 12.2 |
| Day 1 Total | 187/6 | 187 | 6 | 65.2 |
The session breakdown illustrates how the day’s balance changed.
South Africa struck three times before lunch and took another three wickets during the afternoon.
Australia finally completed a wicketless passage in the abbreviated final session, adding 38 through Renshaw and Cummins.
The recovery was meaningful, but the total remained modest.
South Africa will begin Day 2 with a strong opportunity to secure a first-innings advantage if they remove the remaining Australian batters without conceding a substantial lower-order partnership.
Australia’s Injuries and Selection Changes Are Already Influencing the Series
The selection difficulties facing Australia began before the first ball was delivered.
Cameron Green was ruled out of the opening Test after sustaining an abdominal strain during the preceding ODI series.
Green had been one of Australia’s more productive Test batters against Bangladesh and offered valuable flexibility in the middle order.
His absence removed an established option from the batting lineup and contributed to the decision to move Renshaw down the order.
Josh Inglis was also unavailable because of a fractured right index finger, forcing Australia to add further cover to the touring squad.
Those two injuries created a selection problem rather than simply reducing the number of available players.
Australia needed to decide whether to prioritize an established specialist batter, a versatile all-rounder or another emerging player.
Maddinson’s selection was the eventual answer for the opening Test.
His 33-ball duck will inevitably attract scrutiny, although the full consequences of that decision cannot be assessed after one innings.
Did Any Player Sustain a Confirmed New Injury on Day 1?
The available official reporting does not establish a significant in-game injury that forced a player to retire or leave the field permanently.
Smith was struck on the finger shortly before his dismissal, but no confirmed diagnosis or medically enforced withdrawal was reported.
Continue the Cricket Story

The important availability developments remain the pre-existing injuries to Green and Inglis, the illness affecting Connolly before selection, Rabada’s recovery from a hamstring problem and Nortje’s return to Test cricket.
These circumstances should remain distinct from injuries sustained during the actual match.
South Africa’s Advantage Carries World Test Championship Significance
The first Test is the opening contest of a three-match series between the two leading teams in the current World Test Championship standings.
Australia entered the series with a points percentage of 80, while South Africa were second on 75 percent.
The visitors also arrived with the memory of losing the 2025 World Test Championship Final to South Africa at Lord’s.
Aiden Markram’s century and Rabada’s nine wickets had helped the Proteas defeat Australia and claim the title.
The return to South Africa for a Test series is therefore significant for both teams.
Australia are trying to protect their position at the top of the current championship. South Africa have an opportunity to build on their status as reigning champions through victories against a direct rival.
TSE examined the historical background, the 2018 ball-tampering scandal and the current championship stakes in our comprehensive South Africa vs Australia Test series preview.
Friday’s performance gave South Africa an encouraging start to that contest, even though the game remains far from decided.
Can South Africa Turn Early Control Into Another Victory?
South Africa’s recent record against Australia suggests they are capable of sustaining pressure.
They defeated Australia 2-1 in the preceding ODI series, including a 67-run victory in Durban and a 32-run win in Johannesburg.
In the second ODI, Temba Bavuma scored 103 and David Miller made 142 as the hosts secured the series.
That performance, documented in TSE’s report on South Africa’s sixth consecutive ODI series triumph over Australia, demonstrated the team’s ability to withstand difficult moments and respond with substantial contributions from senior players.
Test cricket requires a different type of endurance, and South Africa have not yet batted in Durban.
The immediate challenge is to complete the Australian innings quickly before demonstrating that their own top order can handle Cummins, Starc and Hazlewood.
South Africa vs Australia First Test: Full Day 1 Scorecard
Australia First Innings: 187/6 in 65.2 Overs
| Batter | Dismissal | Runs | Balls | 4s | 6s | Strike Rate |
|---|---|---|---|---|---|---|
| Nic Maddinson | b Jansen | 0 | 33 | 0 | 0 | 0.00 |
| Travis Head | c Verreynne b Mulder | 9 | 19 | 2 | 0 | 47.36 |
| Marnus Labuschagne | lbw b Mulder | 37 | 58 | 6 | 0 | 63.79 |
| Steve Smith | c Mulder b Jansen | 25 | 53 | 0 | 2 | 47.16 |
| Matt Renshaw | Not out | 46 | 115 | 3 | 0 | 40.00 |
| Alex Carey (wk) | c Markram b Nortje | 14 | 44 | 1 | 0 | 31.81 |
| Beau Webster | c Verreynne b Nortje | 4 | 2 | 1 | 0 | 200.00 |
| Pat Cummins (c) | Not out | 33 | 72 | 5 | 0 | 45.83 |
| Extras | 14 leg-byes, 4 no-balls, 1 wide | 19 | ||||
| Total | 65.2 overs, 6 wickets | 187 | 2.86 RR |
Yet to bat: Mitchell Starc, Nathan Lyon, Josh Hazlewood.
Fall of wickets: 1-17 (Travis Head, 7.5 overs), 2-24 (Nic Maddinson, 10.2), 3-84 (Marnus Labuschagne, 25.6), 4-84 (Steve Smith, 26.3), 5-120 (Alex Carey, 41.4), 6-124 (Beau Webster, 41.6).
South Africa Bowling Figures
| Bowler | Overs | Maidens | Runs | Wickets | Economy |
|---|---|---|---|---|---|
| Marco Jansen | 16 | 7 | 35 | 2 | 2.18 |
| Wiaan Mulder | 15 | 6 | 31 | 2 | 2.06 |
| Anrich Nortje | 13.2 | 2 | 40 | 2 | 3.00 |
| Keshav Maharaj | 7 | 0 | 33 | 0 | 4.71 |
| Simon Harmer | 14 | 1 | 34 | 0 | 2.42 |
Australia’s Partnerships on Day 1
| Wicket | Batting Pair | Runs Added | Score |
|---|---|---|---|
| 1st | Head and Maddinson | 17 | 17/1 |
| 2nd | Maddinson and Labuschagne | 7 | 24/2 |
| 3rd | Labuschagne and Smith | 60 | 84/3 |
| 4th | Smith and Renshaw | 0 | 84/4 |
| 5th | Renshaw and Carey | 36 | 120/5 |
| 6th | Renshaw and Webster | 4 | 124/6 |
| 7th | Renshaw and Cummins | 63* | 187/6 at stumps |
Scorecard status: Australia’s first innings remains incomplete. Renshaw and Cummins will resume batting on the second morning.
What Must Australia and South Africa Do on Day 2?
Australia Need Renshaw and Cummins to Push the Total Beyond 200
Australia’s immediate priority is to preserve their seventh-wicket partnership and add enough runs to make South Africa’s first innings uncomfortable.
Renshaw resumes on 46 and has an opportunity to complete a half-century.
Cummins is unbeaten on 33, with Starc, Lyon and Hazlewood still to come.
The next target is 200. After that, every additional partnership will add pressure to the South African batting lineup.
Australia cannot assume that a total around 250 will necessarily be competitive, but it would represent a substantial improvement from the precarious position at 124 for six.
The tourists must then rely on their experienced bowling attack to challenge South Africa under similar conditions.
Starc’s left-arm pace, Hazlewood’s accuracy and Cummins’ ability to extract bounce offer a formidable combination if the surface continues assisting seamers.
Lyon may also become increasingly important if the pitch begins offering more turn.
South Africa Must Avoid Allowing the Tail to Change the Match
South Africa begin Saturday in the stronger position, but the unfinished seventh-wicket partnership remains an obstacle.
Jansen, Mulder and Nortje have already demonstrated that Australia’s batters can be challenged through disciplined seam bowling.
Removing Renshaw and Cummins quickly would expose the remaining tail and give South Africa a clear opportunity to secure a significant first-innings advantage.
Allowing the partnership to continue beyond 100 runs, however, could turn a dominant bowling display into a more evenly contested first innings.
The Proteas will also need to bat intelligently against Australia’s experienced pace attack.
Markram and Ryan Rickelton are expected to begin the reply, followed by David Bedingham, Bavuma and Tristan Stubbs.
South Africa’s ability to preserve wickets against the new ball may determine whether their first-day advantage becomes a lasting advantage in the Test.
What Are the Revised Day 2 Session Times?
Play is scheduled to resume at 9:30 AM South African local time on Saturday, October 10.
| Session | Local Time (SAST) |
|---|---|
| Morning | 9:30 AM to 11:30 AM |
| Lunch | 11:30 AM to 12:10 PM |
| Middle session, extended | 12:10 PM to 2:40 PM |
| Tea | 2:40 PM to 3:00 PM |
| Final session | 3:00 PM to 5:00 PM |
These scheduled timings are intended to recover some of Friday’s lost playing time. Actual play remains subject to weather, light and the match officials’ decisions.
The wider series continues with the second Test in Gqeberha from October 18 and the third Test in Cape Town from October 27.
South Africa ended Friday with six wickets and the stronger scoreboard position. Australia ended it with their most important partnership intact.
For the hosts, the task is to finish the innings they had almost broken. For the visitors, the challenge is to ensure their late resistance becomes the beginning of a genuine recovery rather than a brief delay before South Africa take control.
South Africa vs Australia First Test Day 1: Frequently Asked Questions
What Was Australia’s Score at Stumps on Day 1?
Australia finished at 187 for six after 65.2 overs on October 9, 2026, at Kingsmead in Durban.
Who Was Australia’s Leading Run-Scorer?
Matt Renshaw top-scored with an unbeaten 46 from 115 balls. Captain Pat Cummins remained not out on 33 from 72 deliveries.
How Many Wickets Did Anrich Nortje Take on His Test Return?
Nortje took two wickets for 40 runs from 13.2 overs. He dismissed Alex Carey and Beau Webster in the same over.
Who Took the Most Wickets for South Africa?
Marco Jansen, Wiaan Mulder and Anrich Nortje each took two wickets. Jansen conceded 35 runs, Mulder 31 and Nortje 40.
Why Was Nic Maddinson Selected to Open for Australia?
Australia reshuffled their batting order following injuries to Cameron Green and Josh Inglis. Maddinson returned to the Test side as an opener, with Matt Renshaw moving to No. 5.
How Many Runs Did Maddinson Score?
Maddinson was dismissed for a 33-ball duck, bowled by Marco Jansen. Australia were 24 for two when he departed.
Why Did Play End Early at Kingsmead?
Umpires suspended play because of deteriorating light conditions after 65.2 overs. Conditions failed to improve sufficiently for play to resume.
Was Kagiso Rabada Playing for South Africa?
No. Rabada missed the first Test while continuing his recovery from a hamstring injury. Anrich Nortje returned to the Test lineup.
When Does Day 2 Begin in Durban?
Day 2 is scheduled to start at 9:30 AM South African local time on October 10, 2026. The middle session will be extended to compensate for lost playing time.